 Happy Halloween, everyone! Halloween is one of my favorite holidays and I loved that I was able to make something fun and festive for dinner! The original recipe for mummy dogs calls for Pillsbury Crescent rolls, which are extremely fattening and unhealthy. I tried out a new biscuit recipe instead and they came out great! For the boo-tatoes I used 365 organic instant potatoes. They are delicious and make extremely creamy potatoes which were great for the ghosts. I know I should of posted this recipe before Halloween, but unfortunately I was too busy. Make them next year if you can!
Ingredients for Mummy Dogs:
Preheat the oven to 450 degrees. Mix together the flour, baking powder, baking soda, and salt. In a separate bowl, whisk together the buttermilk and oil. Add the milk mixture to the flour mixture. Mix it with a wooden spoon or with your hands. This works better than the standing mixer. Add a little more milk if the dough is too dry to stick together. On a lightly floured surface, knead the dough gently 10 to 12 times. Then, using a floured rolling pin, roll the dough out to about a 1/2 inch thick. Cut the dough into thin strips. Wrap each turkey dog with the strips of the dough. Don't worry if pieces of the dough break off, mummies aren't wrapped perfectly! Make sure to leave a little piece opened at the top for the eyes! Bake the mummy dogs on a non-greased cookie sheet for 12-15 minutes, or until the dough is golden brown. Use ketchup to make two eyes on the mummies and serve with some blood (ketchup). Enjoy! Ingredients for Mashed Boo-Tatoes:
Put the mashed potatoes inside the piping bag and pipe them out into the shape of ghosts. Put two black sesame seeds on each for eyes. Serve with the mummy dogs and enjoy!
6 Comments
 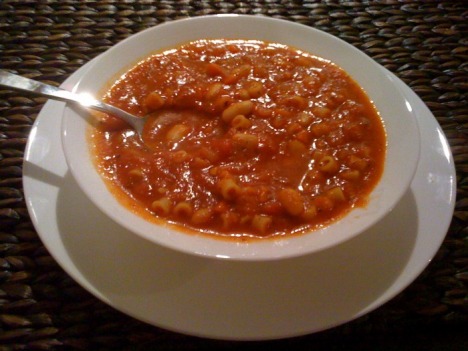 You know when it's freezing outside and all you crave is some delicious soup to warm you to the core? Well, I actually don't know what that's like. You know why? I live in South Florida! However, this soup was absolutely perfect and definitely hit the spot, even on a warm 87 degree Florida day. :)
We paired the soup with some Italian bread toasted with garlic, oil, and mozzarella, and then topped with basil and tomato. This little sandwich was to die for! Even with fat free mozzarella cheese! I found a new brand of fat free cheese that is now my favorite. My husband actually thinks this soup tastes like the old Olive Garden minestrone soup. He loved it! We froze half of it to have it again in a couple of weeks and I can't wait to enjoy it for the second time! :) Ingredients for Tomato Soup:
Preheat the oven to 400 degrees. Warm the olive oil in a large soup pot over medium-high heat. Add the carrots, onion, and garlic and saute until soft, about 5-10 minutes. Add the jars of tomato sauce, chicken broth, cannellini beans, red pepper flakes, pasta, and pepper. Simmer for about 15-20 minutes. While the soup is simmering, put the minced garlic in a small bowl with the olive oil. Cut the loaf in half and then in half again, like a sandwich. Then, using a brush, brush the garlic and oil all over the inside of the bread. Add about three pieces of mozzarella to each piece of sandwich, along with a little more oil, and three or four leaves of basil. Wrap the sandwiches in foil and bake for 10-15 minutes, or until the cheese is soft and melted. Remember, it's fat free cheese so it won't melt the same as regular fat cheese, but it will be soft. After the sandwiches are done, add some tomato slices to each sandwich and serve along side with the soup. This makes about 8 servings of soup, so save some room in your freezer to have some more soup later! 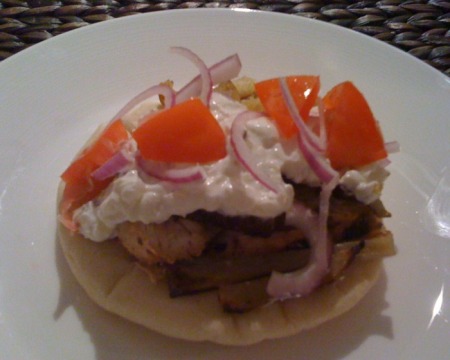 *Warning! This picture does not do the gyro justice. I obviously liked the yogurt sauce a bit too much and smothered my gyro with it. I also overpacked my gyro so much that I couldn't even fold it in half. Woops!* Okay, just a little over two months ago my husband and I were eating authentic chicken gyros in Greece almost everyday for 10 days. Needless to say, I was wary of how good these were going to be in comparison to the mouthwatering Greek gyros. Well, they were absolutely amazing!! They are so close to the original that we were shocked and ate up every bite within a couple of minutes (we didn't even talk!). I actually liked that this recipe is healthier than the authentic ones but you don't miss the fattening ingredients (full fat yogurt, chicken cooked with skin, dark meat, etc.). The original recipe suggests not to use nonfat yogurt, but I promise the consistency and taste was just as good with the brand of yogurt we used. Try this recipe, you will not be disappointed! Thanks to two of my favorite bloggers, Annie Eats and Elly Says Opa for sharing the recipe! (links to their blogs above) Ingredients for Tzatziki Sauce:
To make the tzatziki sauce, strain the yogurt using cheesecloth over a bowl. Let strain for several hours or overnight (I did it for about 24 hours), to remove as much moisture as possible. Shred the cucumber (I used a cheese grater). Wrap in a towel and squeeze to remove as much water as possible. Mix together the strained yogurt, shredded cucumber, garlic, white wine vinegar, salt and pepper to taste, and lemon juice. Drizzle lightly with olive oil. Refrigerate for at least 30 minutes to allow flavors to meld. To prepare the chicken, combine the garlic, lemon juice, red wine vinegar, olive oil, yogurt, oregano, and salt and pepper to taste in a ziploc bag. Swoosh the bag around a bit to make sure that everything is mixed well. Add the chicken pieces to the bag and massage the marinade all over the so that each piece is well coated. Cover and refrigerate for at least 1 hour. Cook the chicken as desired, either in the skillet or in a broiler. I cooked the chicken on the griddle to get some grill marks and then finished cooking it in the oven. Once the chicken is complete, let it rest for a few minutes, and then cut it into strips. Heat the pitas in the toaster or oven, with a little olive oil on top if desired. Serve immediately and get ready for your mouth to water!! Enjoy :) 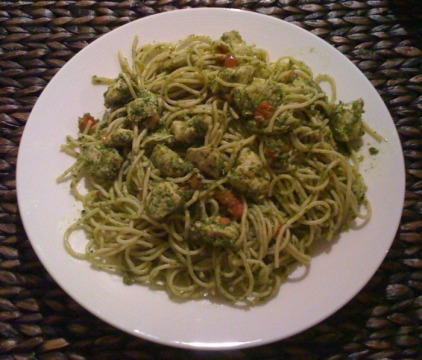 I believe this was the second recipe I ever learned how to cook, about 10 years ago when I was in high school. The recipe has completely changed since then and now it's one of my quick and easy go-to meals that uses only a few ingredients that are standard in our household. This is a an easy recipe to make your own by adding or changing ingredients. I basically eyeball everything while I make it, so make sure to taste it as you go along and adjust the seasoning to your liking!
Oh and I know it kind of looks like some green slop, but it's a very tasty green slop! Ingredients:
Cook the pasta according to package directions. Make sure to salt the pasta and set aside. While the pasta is cooking, cut the chicken into cube or bite-size pieces. Heat a large skillet with 2 to 3 tablespoons of olive oil and cook the chicken on medium-heat, stirring occasionally. While the chicken is cooking, put the onion chunks, whole garlic cloves, lemon zest, and entire bag of spinach into a food processor. Pulse until everything is f minced and a pesto consistency. Then, while the food processor is still on, add 1/4 cup of the olive oil to the pesto. Turn off the food processor, remove the lid and add some salt and pepper and taste. After the chicken has cooked, turn the heat down to a simmer and add the pesto to the skillet. Also add the juice of about half a lemon, or more according to taste. Stir well to combine the chicken with the pesto. Simmer the pesto on low heat for about 5-10 minutes so that the garlic and onion cook a little. Taste the pesto and see if it needs more salt, pepper, or lemon juice. Once the desired flavor has been created, add the pasta to the skillet and stir well to combine. Enjoy! 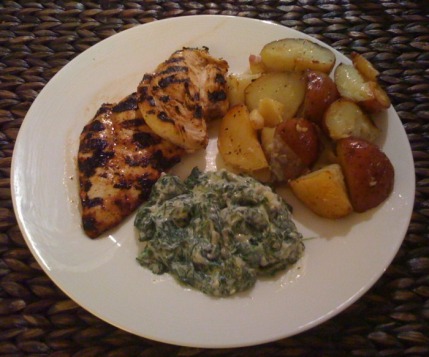 My husband actually came up with this recipe when he lived alone and was searching for something easy to make. He loved Newmans Balsamic Vinaigrette, so he decided to try it as a marinade for chicken. The outcome was amazing! I was even impressed when he made it for the first time. We use Newman's Light Balsamic Vinaigrette because the flavoring in the regular dressing is a bit too strong as a marinade. Try this, it's easy and delicious!
Ingredients:
Put chicken breasts into the re-sealable plastic bag (large ziploc bag) and pour some of the dressing into the bag, until all of the chicken is completely covered (about 3/4 of the bottle). Massage the marinade into the chicken while in the bag, and refrigerate for at least 30 minutes to a couple of hours. Massage the marinade on the chicken occasionally. Heat up the grill and grill the chicken for about 5 minutes on each side, or until cooked through. Serve with your favorite side dishes. Enjoy! 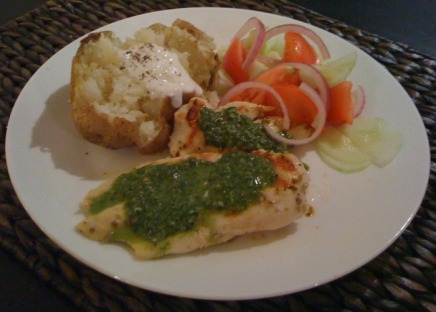 Giada has yet to fail me, and this is one of our absolute favorite Giada recipes. The sauce on this chicken is amazing, and I have made it slightly different ways and its always yummy. Oh and even though this is a strongly flavored chicken, it's always a crowd pleaser!
I actually had the fun time of using my griddle for the very first time for this recipe! Usually we grill on an outdoor grill, but since we are living in a condo, the indoor griddle had to do. That thing is great! We didn't get awesome grill marks, but they were definitely there and the chicken was moist. The best part was, the griddle was so easy to clean! I highly recommend purchasing one of these if you don't have one already. We also use the smooth side for pancakes every Saturday :). Ingredients:
Meanwhile, blend the basil, garlic, lemon zest, remaining 1/4 cup lemon juice, 3/4 teaspoon salt, and 1/2 teaspoon pepper in a blender until smooth. Gradually blend in the remaining 1/3 cup oil. Season the basil sauce, to taste, with more salt and pepper, if desired. Brush the griddle with olive oil and heat it on high. Grill the chicken until just cooked through, about 5 minutes per side. Transfer the chicken to plates. Drizzle the basil sauce over and serve. We served our chicken with a baked potato and some salad. The potato was topped with some plain low fat yogurt, salt, pepper, and garlic powder. The salad was just some chopped up red onions, cucumbers, and tomatoes topped with some low fat balsamic vinegar dressing. Enjoy! 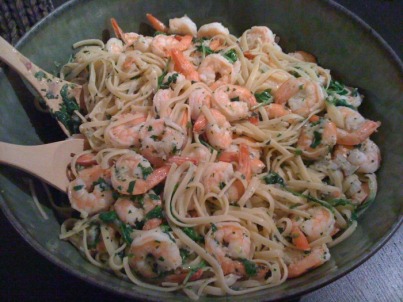 WOW! This Giada recipe was absolutely delicious. I stumbled upon it on The Food Network's website last week and bought all the ingredients to make it ASAP! While making it I became a little concerned that the end result may be a little to "lemony" tasting, but the flavoring was absolutely perfect. This is definitely going into the regular rotation!
Lemon Oil Ingredients:
For the lemon oil: Combine the olive oil and the lemon zest in a small bowl and reserve. For the pasta: *Tip - Prep all the ingredients before you begin cooking. Dice the shallots, mince the garlic, zest the lemons, chop the parsley, etc. This will make the cooking process much less stressful when you get started! Cook the pasta according to the package directions. Make sure to salt the water! In a large skillet, heat the olive oil over medium heat. Add the shallots and garlic and cook for about two minutes or until soft and fragrant. Add the frozen shrimp and cook until pink, which should be about five minutes. Stir the shrimp a little bit so that it thaws out quicker and breaks apart. I found that putting the lid on the skillet sped up the cooking process of the shrimp. Once the shrimp is cooked, add the cooked linguini, lemon juice, salt, and pepper. Toss well to combine. Turn off the head and add the arugula. Toss more so that the arugula is evenly distributed throughout the pasta. Using a mesh sieve, strain the lemon zest out of the reserved lemon olive oil and add the oil to the pasta. Discard the zest. Add the chopped parsley to the pasta and toss more to combine. Serve immediately. Try this recipe, it's perfect! 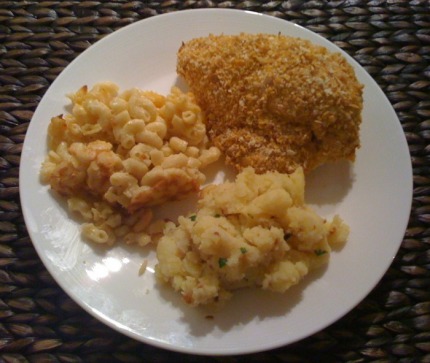 I really love Ellie Krieger from the show on Food Network called "Healthy Appetite with Ellie Krieger". She has lots of amazing low fat and healthy recipes, many of which I can eat without altering them at all! I saw her make Oven Fried Chicken on one of her shows and thought it looked delicious. When I read the reviews online, everyone raves about it, and now I can too!
The recipe was delicious and easy to make. I loved the crusty outside and moist inside. The flavorings are really good and I think this chicken would also be amazing as chicken tenders with a honey mustard dipping sauce. Next time I may try adding a little bit more Dijon mustard because I love that flavor. I made some changes to the original recipe, I used Fat Free Saltines instead of Whole Wheat Saltines and I only used white meat chicken on the bone instead of boneless chicken breast. I served it with mashed potatoes and macaroni and cheese, but something green would definitely have been awesome too. The recipes for the macaroni and cheese and mashed potatoes can be found in the links above! Ingredients:
Preheat oven to 400 degrees F. Lightly spray a baking sheet with olive oil. Combine the crackers and corn cereal crumbs, sesame seeds, cayenne, and garlic powder in a shallow bowl. Reserve. In a large bowl, combine egg whites, yogurt, Dijon mustard, and salt. Add the chicken pieces and coat thoroughly with the yogurt mixture. One at a time, dip the chicken pieces in the cracker mixture, packing crumbs onto chicken. Arrange the chicken on a baking sheet and spray lightly with olive oil cooking spray. Bake for 45 to 50 minutes, or until juices run clear when chicken is pierced with a knife.  We eat leftovers pretty much every single day, so eating them in a new way is always a great thing! The day after we make Spaghetti and Turkey Meatballs (link to recipe above) we almost always make meatball subs. This is a quick and easy meal and it really makes our leftovers taste like something different. Enjoy :).
Ingredients:
Preheat the oven to 400 degrees. Heat the spaghetti and meatballs from the night before in the microwave until hot. While the meatballs are heating, slice the loaf of bread in 6 inch or 12 inch pieces, or however large you want each sub be. Then, slice each piece in half lengthwise. Put as many heated meatballs in the sub that can fit. Spoon some spaghetti sauce over the meatballs, sprinkle with oregano, and then top with some fat free mozzarella cheese. Spoon some more sauce on top if you like. Put the subs on a baking sheet and heat them in the oven for about 10-12 minutes or until the bread is toasted and the cheese has melted. Serve with some leftover spaghetti on the side. Yummy and filing! 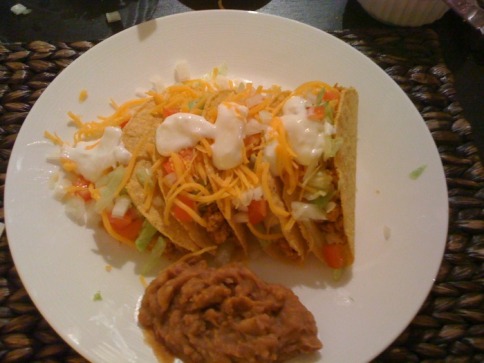 I love Mexican food, but usually don't love the way it makes me feel afterwards. Since I have been on the Swank diet, I have altered regular Mexican dishes to be low fat and they make me feel GREAT afterwards! They taste amazing too. Turkey Tacos are one of my favorite meals and it is extremely easy. I made this meal in less than 30 minutes today. Also, I used an organic taco dinner kit and these are the only ones I recommend for you to use. Regular taco kits have fattening ingredients and/or very unhealthy ingredients such as MSG, hydrogenated oils, palm or coconut oil. You can find an organic taco dinner kit at Whole Foods, sometimes Publix Greenwise, or your neighborhood organic food store. :) Ingredients: - Garden of Eatin! Yellow Corn Taco Dinner Kit - 1 package of Extra Lean Ground Turkey (I like Jenny-O) - 1 TSP of vegetable oil (I like Mazola) - 1 package taco seasoning (comes with kit) - 3/4 cup of water For the toppings (make sure to have some extra for taco salad leftovers): - Non-fat/Low-fat plain yogurt - Kraft Fat Free Cheddar Cheese - Onions, chopped - Tomatoes, chopped - Lettuce, shredded (I usually buy a head of lettuce so I can make taco salad the next day) - Fat Free Refried Beans (I like Old El Paso) - Taco Sauce/Hot Sauce if you like Directions: Preheat the oven to 350 degrees. Prepare your toppings. Chop the onions and tomatoes and set them aside. Put the refried beans in a small pot on low until heated through, stirring occasionally. Gather the cheese and yogurt and also set aside. Once the toppings are ready, put the vegetable oil in the pain and brown the turkey over medium heat until the turkey turns from pink to white. Make sure to break the turkey into tiny pieces. Once the turkey is cooked and ground up, add 3/4 cup of water and the taco seasoning. Mix well until everything is combined and all the meat is coated with the seasoning. Simmer the meat for 5 minutes or until the liquid is absorbed (since there is barely any fat in this dish, this will happen quickly). While the meat is simmering, place the taco shells on a baking sheet and bake them for 5 minutes. After the taco shells and meat are ready, set your table and prepare your tacos! This meal is also amazing the next day in a taco salad - mmmm! Enjoy this extremely tasty and easy dish! 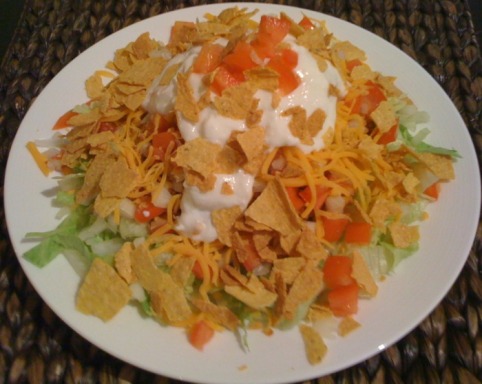 Here is the taco salad the next day. Leftovers can be so delicious!
|  AuthorMy name is Michelle Bolooki and I was diagnosed with Multiple Sclerosis in June 2002. I have been on the Swank MS Diet since April of 2005. I have created this blog in order to share some delicious and healthy low fat recipes that I have come across the last few years. Enjoy! CategoriesAll |
 RSS Feed